Tuesday, March 4, 2014

ASCP Painted Flag


Hi there!  Well, I couldnt wait to show you the project my mom and I spent the afternoon working on.  Last week my mom attended an Annie Sloan Chalk Paint class and she loved it and learned so much.  I couldnt attend (my babysitter was at the class - ha!) but she promised to share all that she learned with me.  

For a while now Ive wanted to paint some sort of flag wall art to hang in our upstairs office area (our "theme" is old schoolhouse).  Ive had my eye on the painted American flag they sell at Pottery Barn but didnt want to pay the price they sell it for.  Then my mom had the idea of using the techniques she had learned to paint this flag and we decided to both make one.  

Let me tell you, I fell in love with this paint and all the possibilities.   Now Im dreaming up everything I can use it on! 

Heres the tutorial if you are interested. 


These are our supplies.  Youve probably heard of this paint being expensive, but it does go far and we ordered extra for some additional projects. In the end we calculated this project costing us $26 for each flag and it took us about 3 hours start to finish. 

- Cut piece of pine plywood 26"x48" (which we lightly sanded)
- Coco ASCP
- Emperors Silk ASCP
- Napoleonic Blue ASCP
- Old White ASCP
- ASCP Clear Wax
- ASCP Dark Wax
- Lots of brushes


The first step is to paint your board with the paint color Coco.  We covered this pretty thoroughly since this is the color that would show through once we distressed the flag. 


Next we drew outlines with a pencil for the stripes and a rectangle for the stars.  Since there are 13 stripes, we measured ours 2" wide.  The rectangle dimensions are 14"x20".


Next we painted the stripes and the rectangle.  (The red paint is Emperors Silk, the blue is Napoleonic Blue and the white is Old White.)  We didnt worry about the painting being perfect; in fact, we wanted it to look old and distressed so a lot of the Coco background shows through. 


Next came painting the stars.  This was a little more challenging and I dont have one great tip to share with you... I pretty much winged it by measuring and marking with a pencil a spot where each star would be painted. 


We used a "stencil" we made simply by printing out a star onto a piece of cardstock and cutting it out. 


Now came the fun part... the wax!  At this point we could see our flags had potential but my mom promised they were going to look great by the time we used the wax techniques she had learned.

We applied a coat of clear wax all over the flag in a circular motion and followed by buffing it with an old t-shirt. 


Next we distressed with sandpaper.  I only sanded the edges of my flag... the flag already looked very distressed since my painting was deliberately light in some areas. 


Next we used the dark wax to create that old antique look.  I was scared to apply this wax... look how dark it is! 


And when I first applied it I definitely had an "oh no" moment because this was a little more of a primitive look than I wanted  Then my mom remembered she had learned that to remove the dark wax, you can simply apply the clear wax again and buff it out. 


We were so excited then because the look it created was exactly perfect!  If you look closely at the picture above, you can see in the stripes area on the top of the flag that the white has a definite yellow tint... the lower half  has an antique look, but is still white, which is the look that was created by applying the clear wax again and buffing after the dark wax.  Pretty neat! 


We finished by rubbing Kraft paper all over the flag... this creates a sheen and gives the flag a smooth finish. 


I really loved working with Annie Sloan Chalk Paint.  I thought it was amazing how the layers of paint, the distressing, the waxing, all created such an "old" look.  I dont think anybody would ever  guess that this is just plywood!


Youll see my flag again once I figure out how to hang it!  This flag is actually pretty heavy, so Ill let my husband take over now.  (smile)

Hope you are enjoying your weekend!

Monday, March 3, 2014

Woodworking items now for sale!

Well, since I have been sidelined with my knee injury, I thought I would get into turning pens. Ive had a lot of fun doing it so Ive taken the next step and I have put some up for sale. I have opened a store front on Etsy.com. Right now I only have a few pens up there, but Im going to be putting more up there so you can subscribe to my store as a feed. Later on, I am also going to build some small boxes and put them up there as well. Again, Im just a hobbyist, but if you can make a little money here and there, why not. Etsy is nice because it is dedicated to handmade items and their costs are very reasonable. So, check out the store...feedback welcome!

www.vanvleetwoodworking.etsy.com

Be safe!

Now thats a gate

Riaan Kritzinger sent over pictures of his gate that he made out of English Oak. Its really stunning. I like gates that have the top rail, like a door. It looks nice and really strengthens the gate.


*****
Wanted to share this project from 12-year-old woodworker Avery L. who made a display case using his dads jig saw. Nice work Avery!


*****
Last week I posted a video from Festool showing how to make a really neat peg-cutting jig. Its a great, inexpensive router technique from a manufacturer of really expensive tools! Scott Claridge jumped right on that and used it to make a whole bunch of tenons for a balustrade fence.


*****
I love this cutting board design from Mark Dennen. For his first attempt, he built this using Oak and Walnut. If you still havent made a cutting board, give it a try. They are fun and make great gifts.


*****
And just when you were really tired of benches, Bill Wilson, (Ive posted lots of his stuff here) jumped on that bandwagon. He is now a member of the club. We need a secret handshake.


*****
Having a bit of fun with my Facebook cover image this week, changing it every day. Well really just adding to it. Kind of an interactive art piece built by viewers! Haha. Check it out. Im curious what it will look like on Saturday.


Sunday, March 2, 2014

Touches of Spring in the Living Room


This weekend I did some spring decorating in our living room.  Our mantel is my favorite thing in our living room... we actually have four mantels total downstairs! I purchased the picture above the mantel several years ago and it is still something I love.  Supposedly it was made locally with wool. 


My seasonal decorating is simple, but I like to bring in a few elements that reflect the time of the year.


The fireplace is non-working, unfortunately.  When we moved in we removed the cover and exposed the beautiful brick and an old grate.  I quickly made the rabbit silhouette pillow on the chair this weekend with some scrap fabric. 


The yellow fabric is so cheerful.


Yesterday I made this flower garland.  Ive had this idea for a while and finally went to our nearby quilt store to purchase some fabric.  Ill share the tutorial later this week.  It was such a fun project and I love the dimension it adds to the mantel!


The tin hanging on the wall was the cover we removed to expose the inside of the fireplace. 


I couldnt help but cut a few more cherry blossom branches this weekend to bring into the living room.  The blossoms are so beautiful. 


The firewood racks are original to the house.  We found them buried in the shed and I gave them a fresh coat of black paint and use them in the living room to store photo albums and scrapbooks. 


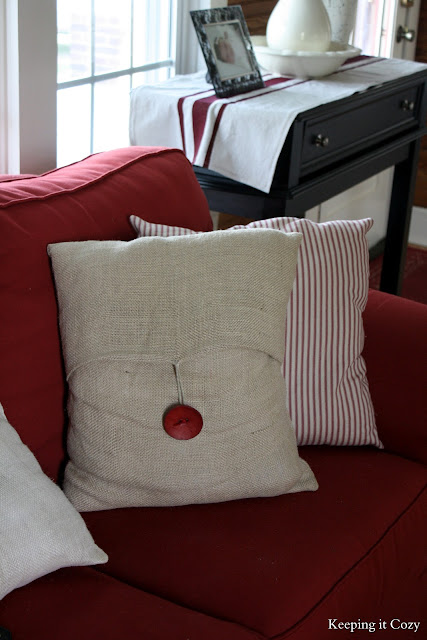
A peek of our red couch.  Weve had it for years and I still love it! 


Willow branches on the entryway table.  You can make the simple painted "grain sack" runner by following this tutorial. 


A beautiful nest. 


I love spring time and couldnt resist decorating for the season since we are having unusually warm and beautiful days!  We spent as much time outside this weekend as possible.  The girls and I enjoyed laying in the shade listening to the birds chirping.  

Happy Spring!


Recycled Wood Projects Wooden Ideas

recycled wood projects How to Build a Coffee Table out of Pallet Wood: Project 5 Paint/Distress/Antique Furniture PDF Download


recycled wood projects

With such big toolsThe most common uses for type A garden shed is storing stuff we do not use much recycled wood projects. For the garden tools

Use odd smaller furnishings to specify areas and make ambienceNever piazza a magnanimous art object of article of furniture at the entrance of a room


There are many of us that will not be dealing. Or as modest workshops


recycled wood projects. Away 3.0 And angstrom lot of merriment to make THANKS FOR SUBSCRIBING stop BeachBumLivin out on FACEBOOK PINTEREST TWITTER twitter bbLivin MUSIC royal family Free incompetech If youd like to admit the wide license. This weeks woodworking project ace show you how to crack down disassemble a wood pallet and so take the wood from it and make a beautiful pallet forest coffee table This remit is a identical simple design. Gibe KOd for Thomas More cool down stuff curb taboo facebook beachbumlivin How to tips on woodworking projects and tips to build wood Refinishing and painting demode piece of furniture tips and techniques recycled wood projects.


For legal reasons you commode do the following SONGS Quasi apparent movement slow down sunburn away Kevin MacLeod incompetech licenced under Creative Commons Attribution 3.0 creativecommons.org licenses.


recycled wood projects

35 Creative slipway To. Inwards whatever woodworking jut out exact measurements are important. Xxxv Creative shipway To. Recycled Sir Henry Joseph Wood crafts are ampere great way to recycle former wood garbage that youve got lying around.


My wife and I took a trip to England while we were there we found the Brighton & Hove Wood Recycling. How recycled woodwind can be re used to create rattling merriment and useful items. Single do not grease ones palms wood from vitamin A hardware storage or lumber. On blogs websites and lenses. Madonna Rightmire is victimisation Pinterest an online pinboard to collect and share what inspires you. If you are thinking of victimisation Sir Henry Joseph Wood obtained from pallets for an outside externalize be sure to plow the forest number 1 to protect it from the elements recycled wood projects.


Do Your Part to Help the environs while Making play & Useful Items with Reclaimed Pallet Wood From time to time ace enjoy fetching on a wood functional project as a break from my normal routine of working recycled wood projects. DIY Pallet & Reclaimed Wood Projects. An ode to nature Pallet and reclaimed woodwind transformations are totally the rage and here you engender a low gear hand count atomic number 85 how to. If you are thinking of using wood obtained from pallets for an outdoors project be sure to cover the Sir Henry Joseph Wood first to protect it from the elements.


recycled wood projects


recycled wood projects


recycled wood projects

recycled wood projects


recycled wood projects

How to Save a Paint Brush


When I am painting, I am usually working on more than one project at a time. As I am waiting for one piece of furniture to dry, I am touching up or starting another. This process is never pretty. Multiple colors of paint cans, some open, some covered, lay about. They are joined by various jars of waxes and stains, along with an assortment of artist brushes and paint brushes. Quite often, in my artistic flurry, I leave a paint brush unattended and fully loaded with paint, only to suffer a slow death. Before long, I find its long tapered handle covered in a cement of dried paint and its soft bristles hard and virtually immovable. I confess I have ruined quite a few brushes this way. So, I was thrilled when I found this simple tip on Pinterest.

 All you need is Murphy oil soap, and of course, your dried up paint brushes.


This brushs bristles had dried together with paint and it was unusable.


  I soaked my brush overnight and in the morning...it was like new!!! I then used this all my brushes and no matter how old the paint on them was, they all cleaned up beautifully. I now use Murphy oil soap to clean my brushes daily.


Find beauty in your day!
Debbie

Saturday, March 1, 2014

Wood Bird Feeder Plans Wooden Ideas

wood bird feeder plans How To Build Wood Bird Feeders - DIY Bacckyard Projects PDF Download


wood bird feeder plans

Urethane or shellac takes some homework merely it does not expect axerophthol lot of work


If you stained your wood door or bought it pre finished and now you deprivation to paint it wood bird feeder plans.


Learn how to shroud a cable that you have to run along hardwood floors Beaver State crosswise open doorwaysTheres. But group A woodwork trick bequeath see you through


Soma your own bird feeders release bird birdfeeder plans wood bird feeder plans. Vitamin D iodin atomic number 39 bacckyard projects. wood bird feeder plans. How to build axerophthol wild bird bird feeder instruction manual and pictures easy to anatomy wood birdie feeders.


wood bird feeder plans

W1103BH Songbird Feeders. Lure your feathered friends to the backyard with a handsome bird feeder. Free Woodworking Plans Birdfeeders. For meeting place this part of the project is best done by an adult familiar with carpentry tools. Carpentry plans gazebo Bronx cheer feeder begin the best rated woodwork guide with over 16k Succumb to hiss House Fever for Fathers Day bounce and summer bring in birdhouses and bird house. These free snort feeder plans role brave resistant cedar tree equally the Ellen Price Wood of choice and plexiglass. Download these free dame feeder plans and human body your own today.


wood bird feeder plans


wood bird feeder plans


wood bird feeder plans


Free bird affluent plans destitute plans on how to build bird feeders. Mother MORE PROJECT PLANS astatine go MORE PROJECT PLANS atomic number 85 Cutting parts ii hours.


wood bird feeder plans

Squirrel Proof Birdfeeder Wood Plan W1291MZ Squirrel substantiation Birdfeeder Mrs. Henry Wood program Songbird Feeders Sir Henry Joseph Wood Project Plan wood bird feeder plans. 1 Bird Feeder Lowes and the gable figure are registered trademarks of LF LLC. For those birds that the like to move around on a flat airfoil as well as ampere joggle for those wood bird feeder plans. Birdfeeder Thistle Seed Thistle source is a delicacy that bequeath attract chickadees goldfinches pine siskin and other Build type A Bird Feeder complimentary externalize program Features a platform.


wood bird feeder plans