Showing posts with label the. Show all posts

Thursday, March 6, 2014

It seems I am the only one who couldnt get the ladder toy to work! Heres a video from Ben Johnson showing how his works. Very cool. Thanks Ben!


*****

Mere Minutes

I am really having a lot of fun building the cajon. Its basically done; I am at the finishing stage. A lot of cajones are brightly colored, so I decided to stain mine a deep red. Today I am applying a bunch of coats of brushing lacquer. I thought this video might be of some help if you have never used brushing lacquer.


Sunday, March 2, 2014

Touches of Spring in the Living Room


This weekend I did some spring decorating in our living room.  Our mantel is my favorite thing in our living room... we actually have four mantels total downstairs! I purchased the picture above the mantel several years ago and it is still something I love.  Supposedly it was made locally with wool. 


My seasonal decorating is simple, but I like to bring in a few elements that reflect the time of the year.


The fireplace is non-working, unfortunately.  When we moved in we removed the cover and exposed the beautiful brick and an old grate.  I quickly made the rabbit silhouette pillow on the chair this weekend with some scrap fabric. 


The yellow fabric is so cheerful.


Yesterday I made this flower garland.  Ive had this idea for a while and finally went to our nearby quilt store to purchase some fabric.  Ill share the tutorial later this week.  It was such a fun project and I love the dimension it adds to the mantel!


The tin hanging on the wall was the cover we removed to expose the inside of the fireplace. 


I couldnt help but cut a few more cherry blossom branches this weekend to bring into the living room.  The blossoms are so beautiful. 


The firewood racks are original to the house.  We found them buried in the shed and I gave them a fresh coat of black paint and use them in the living room to store photo albums and scrapbooks. 


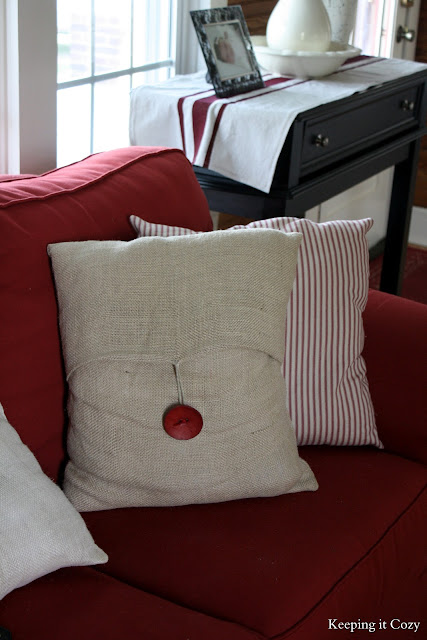
A peek of our red couch.  Weve had it for years and I still love it! 


Willow branches on the entryway table.  You can make the simple painted "grain sack" runner by following this tutorial. 


A beautiful nest. 


I love spring time and couldnt resist decorating for the season since we are having unusually warm and beautiful days!  We spent as much time outside this weekend as possible.  The girls and I enjoyed laying in the shade listening to the birds chirping.  

Happy Spring!


Saturday, February 22, 2014

Whats up for the weekend and next week

Hi Everyone,

I will probably be in the shop this evening and tomorrow as well. Im going to finish sanding the walnut bowls and get them ready for a finish and delivery to their new owners. Ill post final pictures only of those bowls.

The black ash bowl is still on the lathe and guess what?!! It has sold already! Ill need to finish turning it and sand it too and Ill post pictures of the finished project, probably next week before it goes to its new home.

And Ive got a two part project coming up: Im going to be making a collet chuck for the lathe so I can turn a coffee scoop. So Ill have pictures and discussion for you on how to make tools for the lathe and how these tools can be applied to specialized turning problems, in this case, a small diameter turning.

And our 30th wedding anniversary is coming up and Ive asked my husband for some carving knives so I can carve some kitchen spoons. Yes, I have finally caved into several requests for spoons.

So stay tuned and Ill be back shortly with the coffee scoop project.

Best,
VW

Wednesday, February 12, 2014

Raiding the Woodshed

I am currently away from home and visiting my parents in France for the festive period. So while away from my workshop and tools I certainly didnt expect to be making blog posts. 

Lately, I have been reading a lot of stuff by Peter Folansbee. Peter uses predominately Oak which is not sawn but rived by splitting and it inspired me to go and have a rummage through my parents woodshed. 

Walnut - which I think was felled early 2011

Oak of around 1.5ft diameter which was felled late last year 2010

While there are a few Oak & Walnut pieces, unfortunately, everything has been cut to firewood size lengths, but ... with some determination I might be able to get some stock for small boxes. 

The Walnut looks like it would be amazing once dried, planed and finished!

Time to start playing - what tools have my parents got I  can use?

Attacking a likely piece of Walnut - first some mark up.

Using a wedge to scribe all the lines before splitting anything. First lightly, then again to a depth of about 1/4 inch.


First split I am using an old axe head as its wider than the wedges. Its also as dull as dishwater!

Look at that grain! Once I trim the pith and sapwood Im sure there will be something usable...

Ok they are small but Im determined to use them for something

I wish I had a scrub or fore plane handy...

Next culprit - the mighty Oak. Marked out for eighths.

Again I deeply scribed all the lines before splitting.

Hmn ... not what I was expecting.

All splits completed. It helps to not separate each slice after its been split. This keeps the whole thing together and more stable until all the splitting is done. The hatchet is then used to cut the final fibres and release the slices.


Straight grained Oak - I wish these pieces were three times as long! I could easily get 2"x2" lengths for a joined stool

The haul - An hour or twos work with a hammer and wedges. I further re-split each eighth of Oak into sixteenths.

If I had a froe Im sure this Oak piece would split cleanly again into 32nds.

All in all its been a fun afternoon and I have actually learned something useful. I was surprised how accurately the wood can be split if scribed first. In most cases I split the line and couldnt have been more accurate with a saw. I will see how this stock dries out and see if it inspires me to build something. If not - mum has already been eyeing it up for the fire. Its such a shame that the trees were cut down and logged before I started this wood working journey. 

There are still a couple of Walnut and Oak trees on the property which my parents are thinking about removing - rest assured it will be me with the chainsaw  claiming first dibs! This fun little exercise has given me the confidence that I could produce usable stock from a complete tree trunk with very basic tools. Imagine breaking reliance on the Timber yard! - From tree to furniture, now thats a satisfying journey!

Merry Christmas everyone!...

Tuesday, February 11, 2014

The Wondrous Woodshop Widget

It seems like forever ago my friend, Kenneth Woodruff released the Woodshop Widget for iOS. This wasn’t too big a deal for me, as I’m an entrenched Android user. However even I found the web version a fantastic resource. Thankfully, Kenneth has just released the Woodshop Widget for Android.
Now for Android!
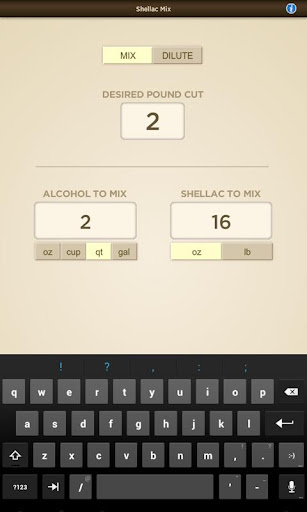
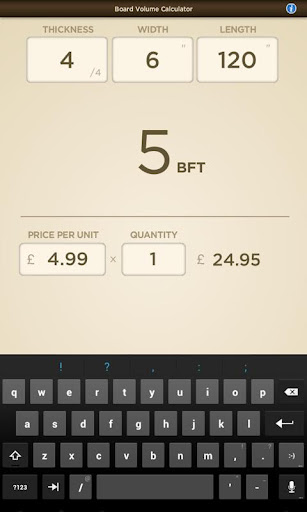
In Kenneth’s words, the Woodshop Widget is a handy collection of woodworking-related utilities, ranging from board volume calculation to shellac mixing aids, squareness testing and many other goodies.
The Very Handy Shellac Pound Cut Calculator.
The Board Foot Calculator (it does $ too).
If you’ve tried the Woodshop Widget on iOS or on the web, you know how fantastic it is. If you’re an Android user as I am, you owe it to your shop to go to the Play Store and buy the Woodshop Widget. Both the iOS and Android versions will cost you $3.99. I’ll tell you based just on the times I’ve use the flash based web version on my phone, that $3.99 is a great deal. Try it out first on the web, and you’ll soon see for yourself how handy the Woodshop Widget is on your phone, in the shop (and at the lumber yard).

What Im working on at the moment

This project is in Sylvania, Ohio.  The customer had some water damage in the basement of the home.  The lower 4 of drywall in the entire basement has been replaced.

The following 2 pictures are of a display area that Im making out of birch plywood.  It will eventually be stained after all of the trim work has been completed.


The kitchen in the basement was completely torn out, along with the masonite on the walls.  Ive installed new Kraftmaid cabinets.  They are a middle of the road cabinet, and very nice to work with.  All doors and drawers have self closing hardware - nice!


Monday, February 10, 2014

The Winner!

And the winner of this years Clash of the Titans golf tournament is: ME! Even though I took a whopping 11 on the 17th hole, I still managed to bring the coveted trophy home to Maumee! Here is a photo of my winnings:

The arched top door Minster OH Installation!

With the glass pack fully installed, installation day has arrived!

Ive enlisted my son as helper for the day. Brad is 15, and is a hard worker! The door weighs between 150-200lbs, so this is not something I could do myself, and he has proven his worth. The entire day, from start to finish, was 15 hours long, but everything is now installed and looking great! I may make a trip down later this week again, and do some tweeking on the lockset and get more pics.

In the fourth picture, you can see the decorative straps behind the screen door. I will get a few more pics of these when I go back down, as they really add a nice flair to the door itself!

The hardware is Schlage, bought online at BuySchlageNow.com. This particular hardware was not available anywhere else, and I had it within a week of ordering.

As a side note, this home does not have an awning or porch, which will effect the life of the finish on the door. Even though there are four coats of spar urethane on the door, it will need to be maintained periodically. This also is an East facing door, located in mid-Ohio, known for high temps in the summer and harsh winds and cold in the winter.

I would like to take this time to thank Chet and Ashley Harrod for being paitent with the whole process. Sometimes, these bigger projects can take time, but theyre worth it! As they have discovered, I will not settle for giving people substandard work, and I believe quality should be job 1. The Harrods are happy with their new doors, and that is what I strive for. Thanks guys!!! See you soon!


Round Table Conversion for the Master Bedroom


A few weeks ago I found this table on craigslist for $25, since it wouldnt fit in my car, I got it delivered for $30. (I miss having a truck)

I love the little casters!

We were originally going to build a stand for the tv since the size had to be very specific, but after realizing that wood alone would cost $100, we decided to hold off, and then I found this!

We are planning on cutting this in half to create a demilune table (the other half might be going upstairs).  Since this wont hold the tv we decided to wall mount the tv instead.


Here is where it will be going ... hopefully I will have more exciting photos soon.

I am off to finish sanding and apply wood filler, the top is pretty beat up!

Crowning the built in

The drywall repairs have been done, and the painting also.  We were able to go back this week and install the crown molding setup and the base trim.  Here are a few more pics.  Some final pics will be coming after the carpet and other finishes are done...


Wednesday, February 5, 2014

The arched top door Minster Oh side two

Here are some pics of the other side of the door. I believe this will be the inside. I plan on starting the finish on Monday, so this will be curing over the next day or so.